Getting Started with Cosmos
This guide is designed for web developers or designers who are getting started with Cosmos for the first time and have a basic understanding of HTML, CSS, and JavaScript. Cosmos is built so the web developer can design a website that then can be handed off to a non-technical client for self-management of content.
In this guide, we will cover:
For next steps we suggest:
- File Manager - Learn how to upload and manage files on Cosmos.
- Image Editor - See how to edit images with Cosmos.
We are here to assist you, and we offer several free support options. We want you to succeed!
1. Install Cosmos
Cosmos is an open-source software, hence it is free to use. It can be installed on Microsoft Azure, and if you don't have an Azure account, you can sign up for free and receive $200 in credit for the first 30 days. A basic Cosmos installation, appropriate for a small business, government agency, personal blog, or portfolio, approximately costs $15 per month to host on Azure. Should you need a firewall, Sucuri is recommended, which is around $10 per month.
Should you need a high performance, highly redundant architecture, we can help you with that design.
Visit this website's installation page, or follow this link for installation instructions on GitHub. Contact us if you need help with this step, or if you need us to host your Cosmos website for you.
What gets installed?
Five components make up the basic install of Cosmos. Using the Azure Portal, navigate to the Resource Group where Cosmos is installed. You should see a list of items like this:
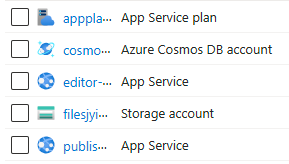
App Service Plans
Cosmos deploys a Linux App Service plan, which provides a suite of compute resources for web applications to operate. Essentially, it's akin to a virtual machine that Microsoft manages, sparing you the hassle of repair or maintenance. Put simply, it's a “Platform as a Service.”
App Services
Cosmos deploys two App Services. The one named beginning with "publisher" serves as your primary website, where your audience can view your content. It's on this App Service that you'll assign your website's domain name. The other App Service, starting with "editor," functions as your content editing platform. It includes WYSIWYG, code, and image editing tools, along with file uploading and management capabilities.
Cosmos DB Account
Cosmos DB is the database for Cosmos CMS. It is a NoSQL, document database fully managed by Microsoft that offers high availability, low latency, and elastic scalability, making it ideal for applications requiring fast and reliable access to data.
Azure Storage account and Static Web Server
Files uploaded to Cosmos are automatically stored as BLOBs in an Azure Storage account. This encompasses all images, CSS, JavaScript, or any other files you might want on your website. Some of these files may be large in size. When the "static website" feature is enabled for the storage account, files placed there are automatically served through the static website. This offers two advantages: firstly, static websites are quick and highly performant; secondly, it offloads asset files from your primary website, significantly speeding it up.
2. Design your website
Nearly all websites feature a design that encompasses elements such as font types and sizes, color palettes, standard page headers and footers, logos, and other images or artwork. Cosmos is crafted to be open-ended, avoiding any restrictions on your creativity, like mandating a specific user interface framework. The open architecture of Cosmos simplifies website design to the essentials, leaving the visual and experiential aspects of your site to your imagination.
Embarking on your web design journey begins with grasping the basics. Start by pinpointing your website's purpose and intended audience. This insight will steer your design decisions. Then, draft a preliminary layout to outline the user experience, focusing on seamless navigation. Select a color palette and typography that resonate with your brand's identity. Employ tools such as HTML, CSS, and JavaScript to realize your concept. Remember to ensure your site is responsive, providing an optimal viewing experience across various devices. Continuously test and enhance your site in response to user feedback. This cyclical process is key to developing a refined and impactful online presence.
Pre-built Designs
Cosmos offers several pre-built designs to use as a foundation, or you have the option to begin from scratch and design your own. Upon the initial installation of Cosmos, you are presented with the choice to implement one of the pre-built designs. If you later choose to adopt a different design, simply open your website editor, select the "Menu" button in the top-left corner, then choose “Site Design.” Following that, click the "Import Design" button.

Note: If you want to create your own design, be assured that Cosmos is built so you can use just about any JavaScript or User Interface framework you wish to use.
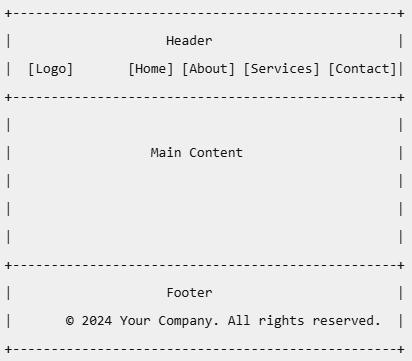
Basic Page Structure
Cosmos offers a straightforward page structure that is optional for your website design. It is beneficial if you desire a consistent header and/or footer across your website's pages. It is also useful for incorporating JavaScript or CSS libraries consistently across your site.
Below is a simple diagram of that page structure. Items in the header or footer will appear on the top and bottom of each page of your website. The main content area is unique to each web page. Note: you don't have to have a common header or footer--in that case put nothing in those areas.
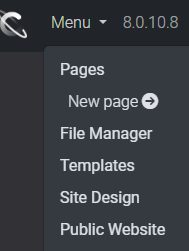
Edit the Site Design
You edit the site design by clicking on the “Menu” button in the editor toolbar, then choosing “Site Design.”
Then you will see a list of all the designs you have loaded, including the “active” design denoted with a green “Default” badge.

Open the design by clicking on the Visual Studio Code icon.
![]()
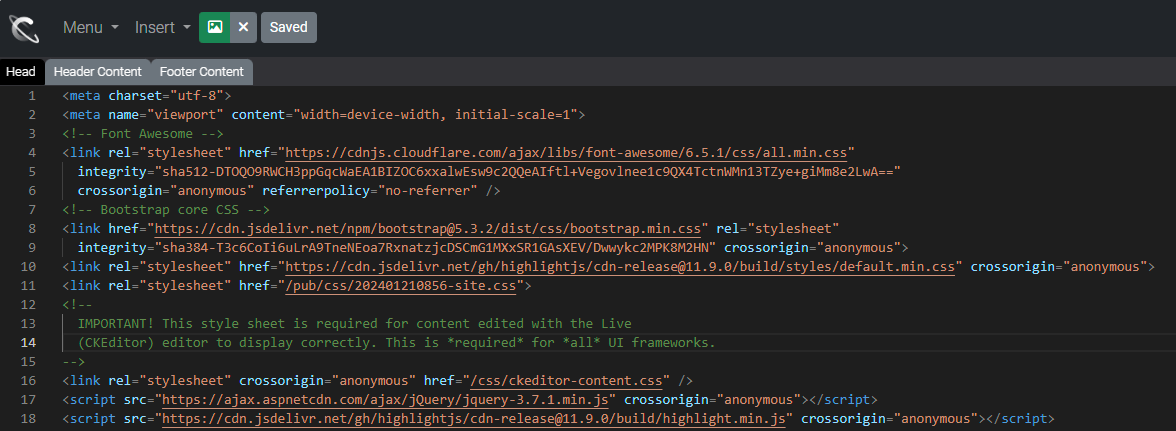
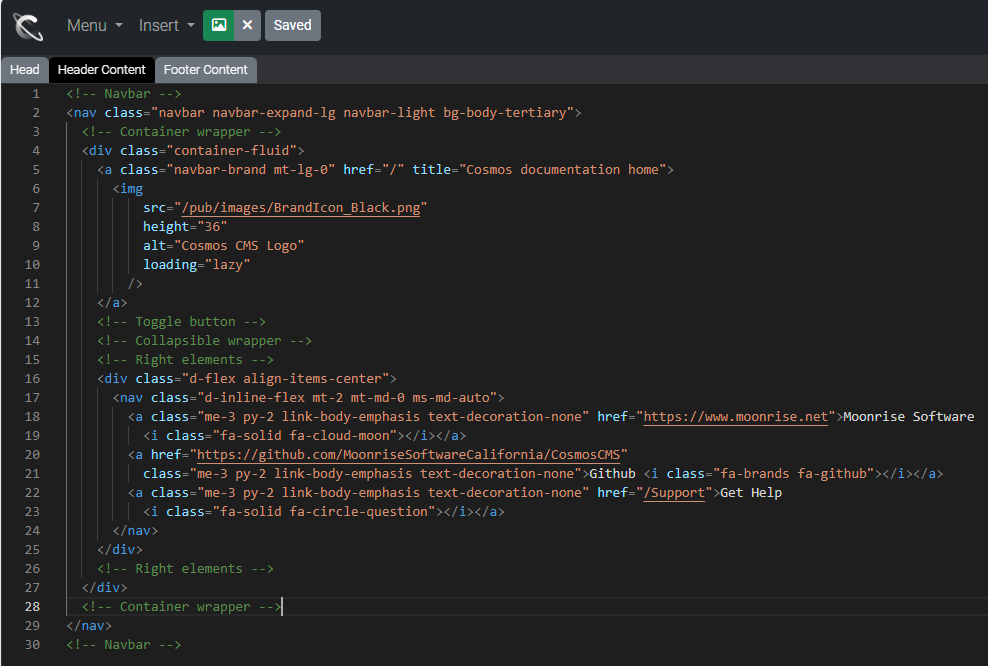
You will see three tabs. The “Head” tab gives you access to the area withing the <head></head> tags above the <body>. This is where you will want to put links and references to CSS and JavaScript that will appear on every page of your website.

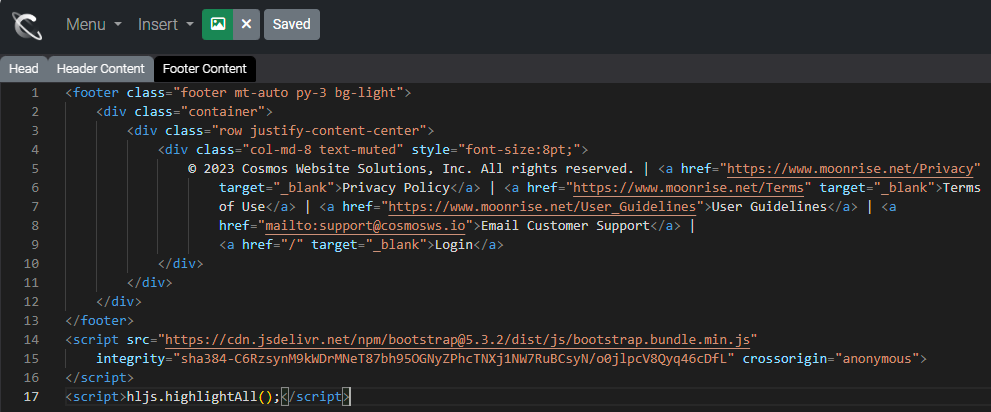
The “Header Content” tab gives you access to the common “header” area mentioned above. Likewise, the “Footer Content” tab gives you access to the “footer” area also mentioned above.
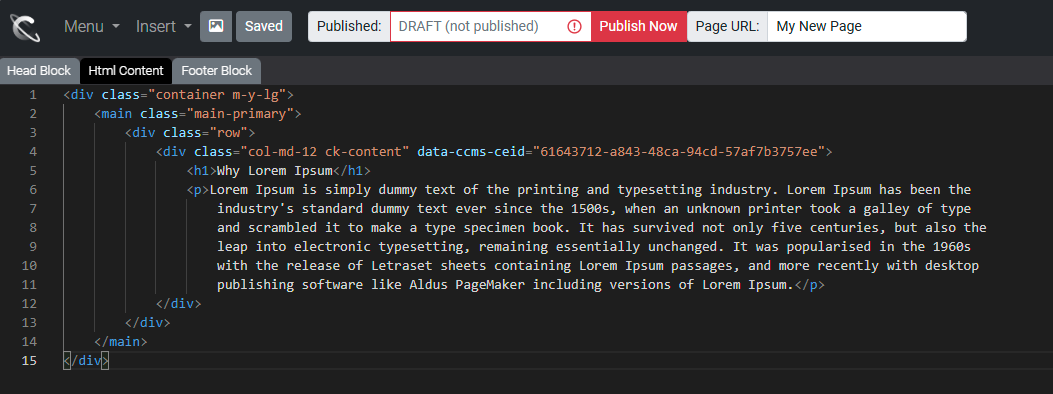
Below are screenshots of a Bootstrap-jQuery based design in use. Remember: you can use the JavaScript and UI framework of your choice; you do not have to use Bootstrap or jQuery.
Example Head
Example Header Content
Example Footer Content
3. Creating a Web Page
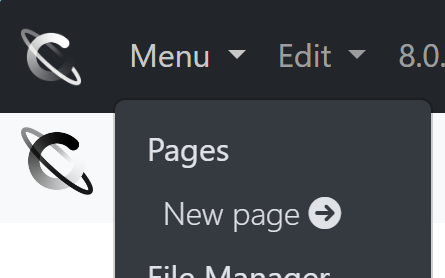
To create a web page, click the Editor “Menu” button and choose “New Page.”
This brings you to the “Create a Page” dialog.
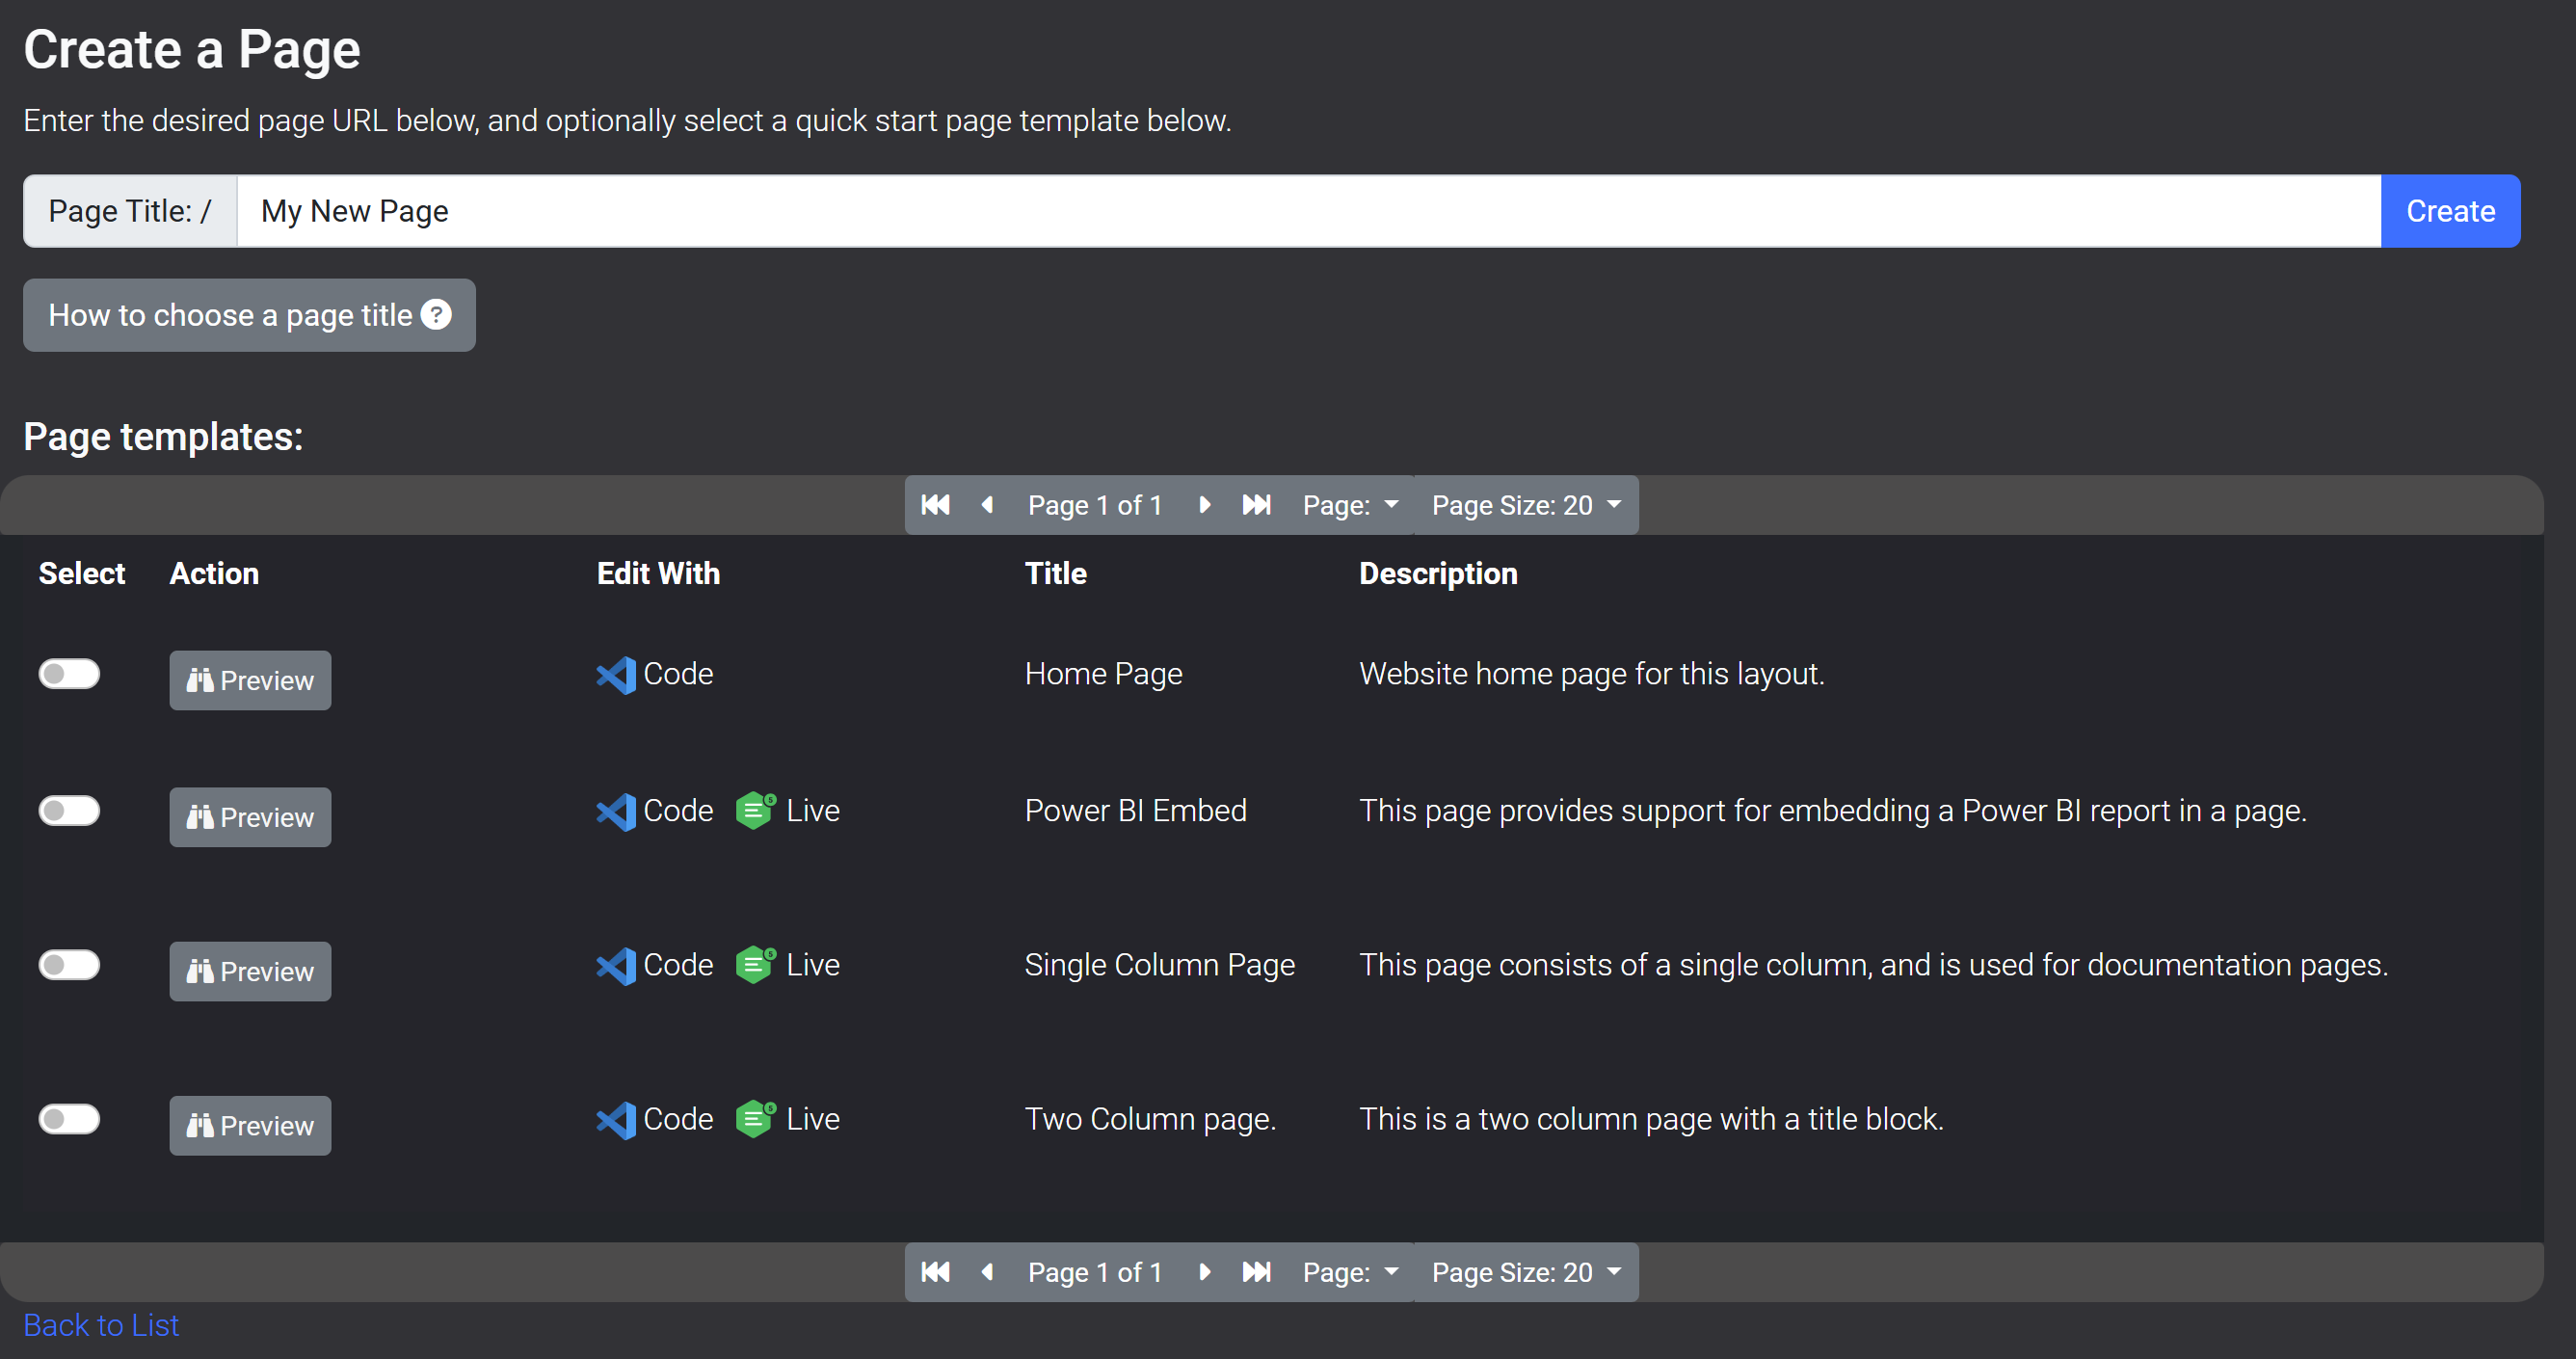
Depending on the site design you loaded, you may see one or more Page Templates. These are pre-built page designs that you can use or create yourself. These are extremely powerful time savers and help make content creation by non-technical clients much faster and smoother. Click on the toggle at the left edge of the template to select it. When you click “Create” the new page will be based on that template.
Click on the “How to choose a page title” button. This describes how titles are automatically turned into Page URLs.
After selecting a page template (or decide not to), and entered a page title, click “Create.”
Now you will be taken to the version list page. As you make changes to this page, Cosmos automatically captures versions. You can compare versions by selecting them and clicking the “Compare” button, promote a version by clicking the up arrow, and “Preview” it.
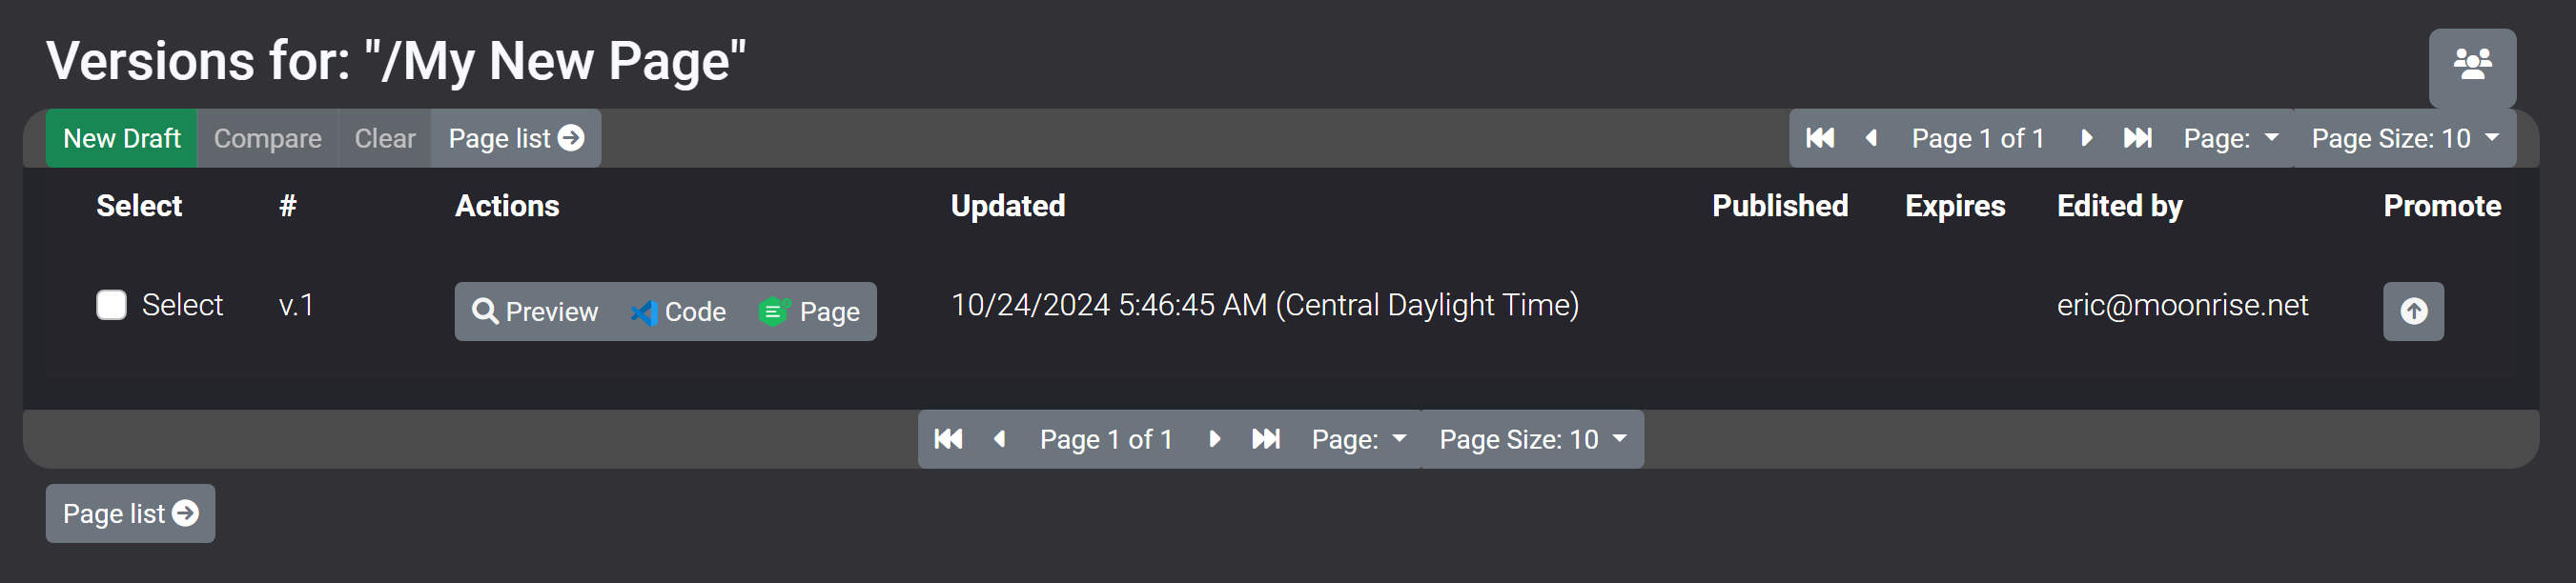
Notice the Code and Page editor buttons. The first opens the page in code view and the second is the WYSIWYG editor.
In this example we are going to click on the Page button to edit it.
4. Edit a Page
The Page editor's goal is to allow users to edit a page in as close as final form it will be in when it is published (i.e. WYSIWYG).
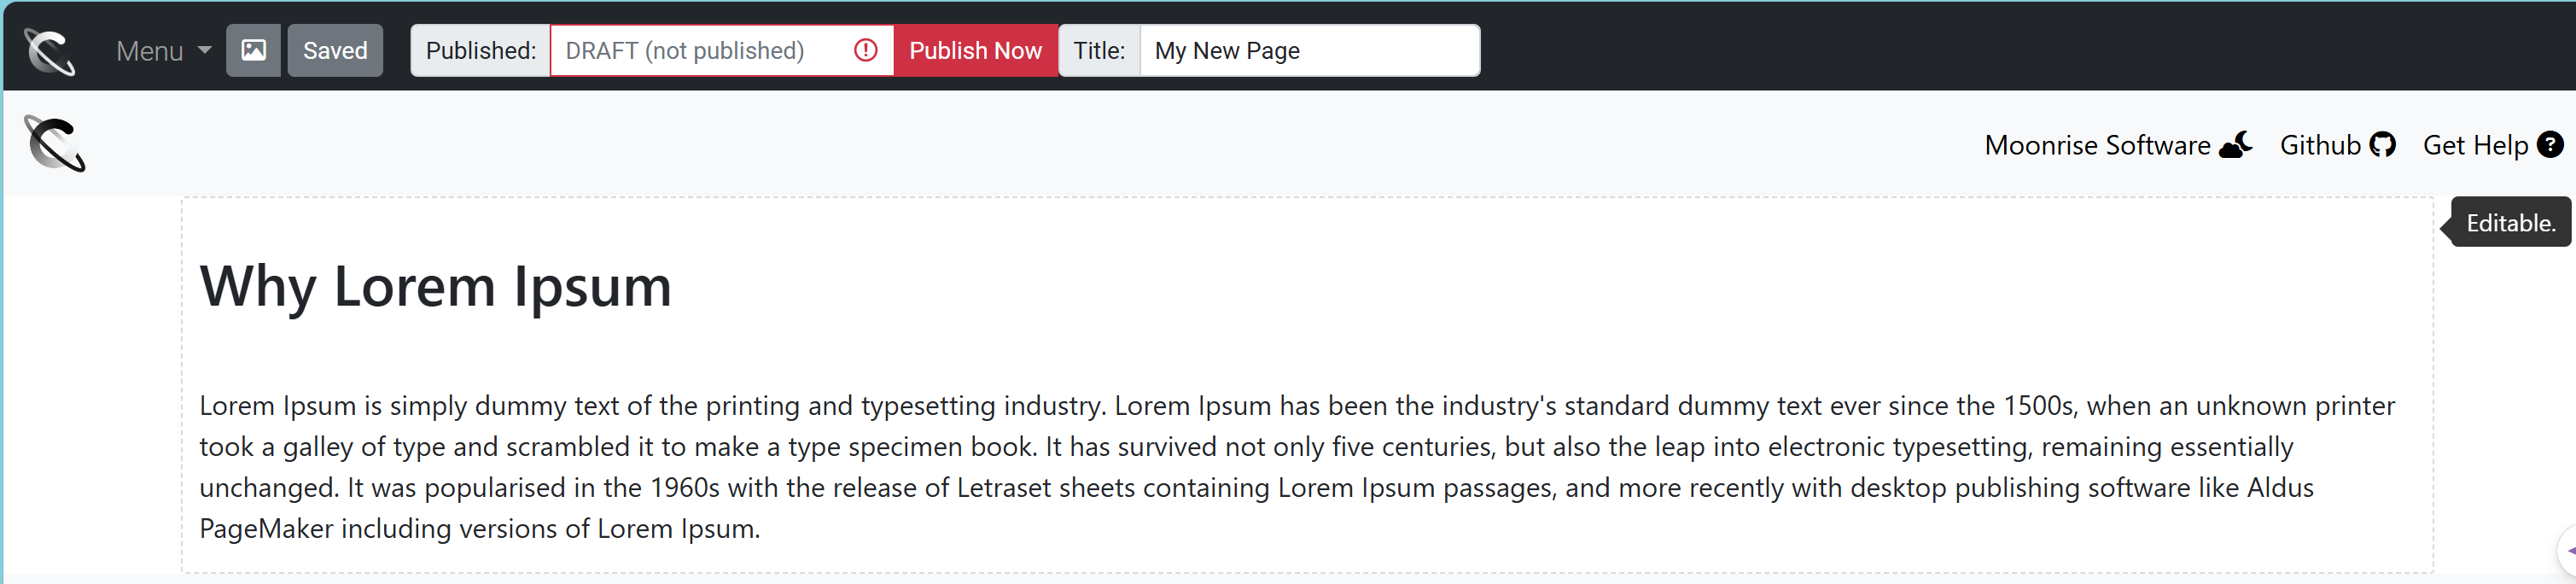
Notice the fine dashed line around the text? This means this area is “editable.” Click in the box and two things will happen: (1) A “tool bar button" will show in the upper left of where you clicked, and the editable area is now surrounded by a solid blue line.

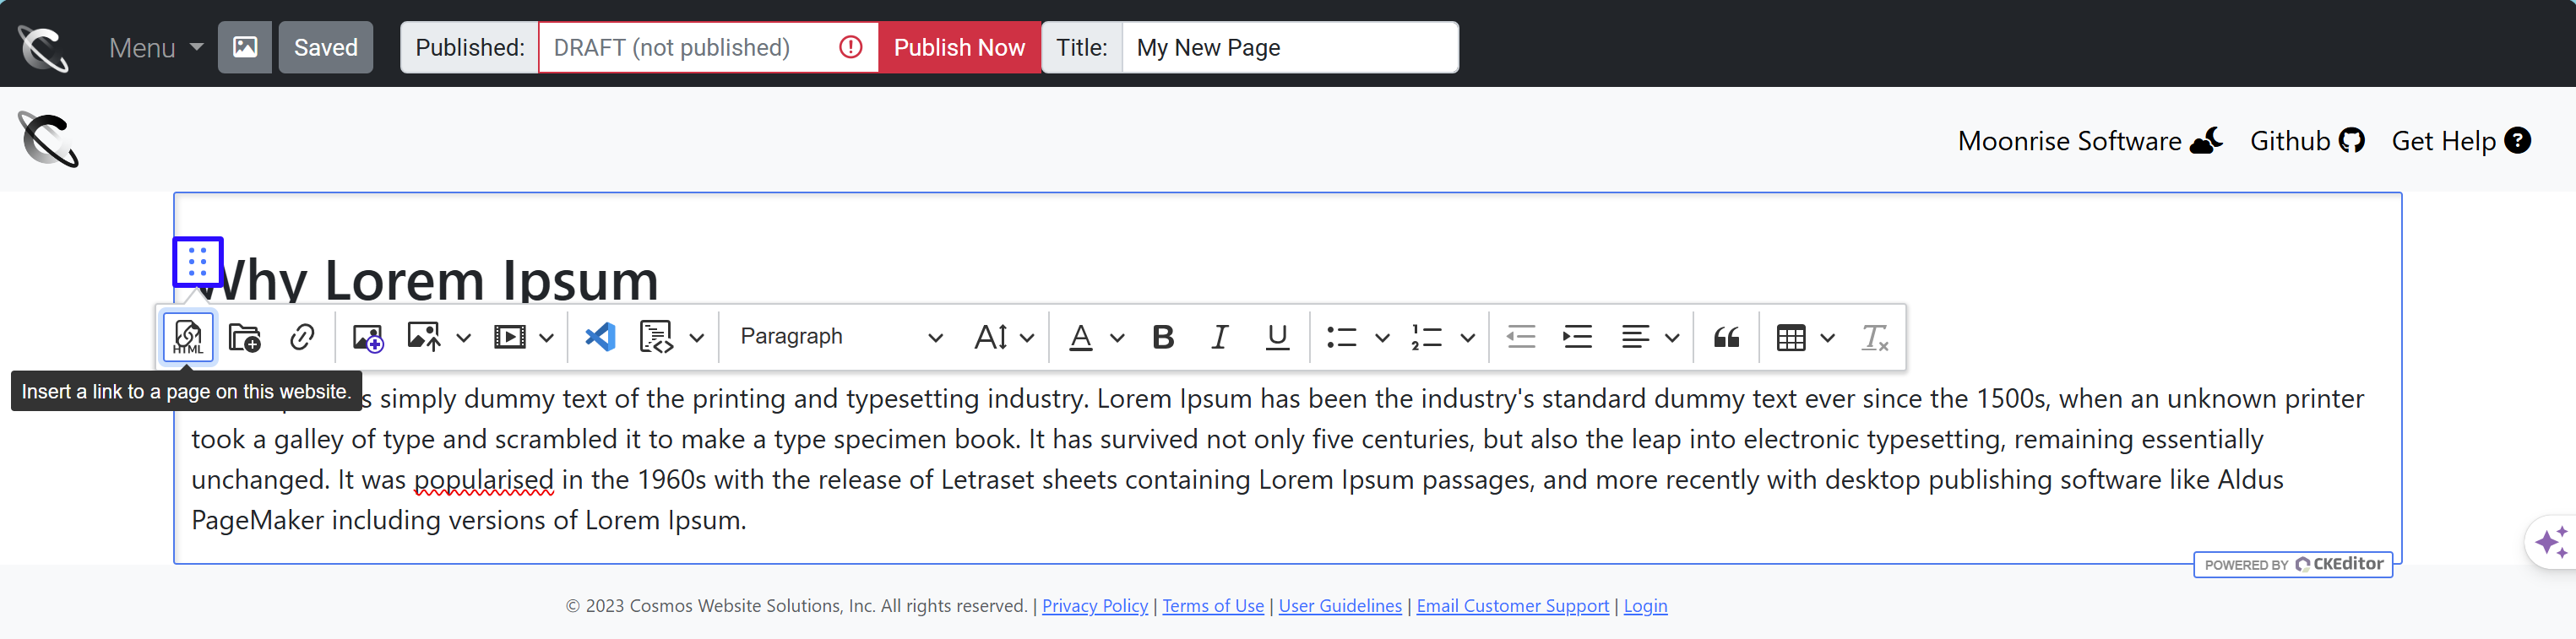
Clicking on the toolbar button will bring up the toolbar like below. For more information about the page editor and its toolbar, see our documentation. As you make your edits, Cosmos automatically saves your changes.
5. Switch to the Code Editor
You may want to switch to the code editor while editing a page. Do so by clicking on the “Menu” button, then choosing “Code editor.”
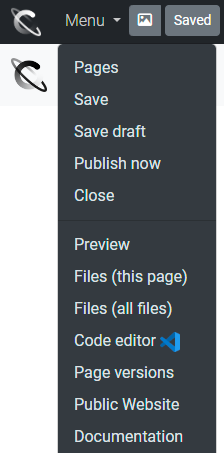
This will bring up the code editor. We have a detailed description of how to use the editor in our documentation.
Just like the Page Editor, the Code Editor saves your changes every few seconds.
6. Publish a Page
You can publish a page from the Code or Page editor. While working on a web page you may notice the toolbar may say “DRAFT (not published)” and next to that a “Publish Now” button.
Publish Now

To make a web page available on your website immediately, click the “Publish Now” button.
Publish in the future
If you want the page to be made available at a future date and time, click the area that says “Draft (not published)” on the toolbar.

This will bring up a calendar widget.

Using the calendar and time, pick when you want the current page version to go live.
Note: This uses your local time. If for your example, you are in the Pacific time zone, and you pick 8:30 AM, Cosmos automatically adjusts for global time zones. So, in this case users in London will see the article at 12:30 AM (or 1:30 AM for daylight savings).
Next Steps:
Now that you have finish this guide, have a look at these other topics:
- File Manager - Learn how to upload and manage files on Cosmos.
- Image Editor - See how to edit images with Cosmos.